The Components of Temporary Containments

By Mark Cornelius, Keith Gangitano, and Michael Pinto
It has become relatively clear that, for now, the supply chain issues brought on by COVID-19 have largely passed. That said, it could be argued that we are entering a new age of scarcity. Dwindling resources, population growth, labor shortages, global conflict, and the proliferation of catastrophic events have all converged to create the perfect storm currently making landfall on our supply chain. It is possible, even likely, that in the future, what you need may not always be readily available.
As we all learn to live differently, you, as a contractor or remediation specialist, must also learn how to do more with less. It isn’t always raw materials; it could also be equipment or personnel. It takes creative problem-solving to do this job and to do it well.
The first installment of this series primarily covered the “why” of using containments. This article is designed to provide the reader with an explanation of developing your containment options. This will represent a combination of tried-and-true approaches that many professionals in the asbestos, lead, mold, blood-borne pathogen, and drug lab cleanup industries already use, along with techniques that must be integrated into various industries. In short, the readers will leave with at least one new takeaway or be reminded of the importance of some technique that may still be useful but has fallen out of favor. We present the information here in ascending order, from the most common containment-building methods to the more innovative ones.
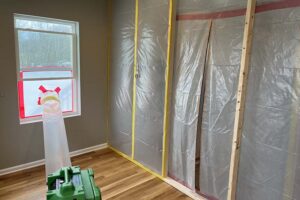
Plastic affixed to surfaces with poles, spray adhesive, and tape
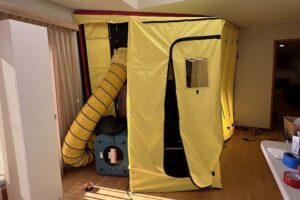
An example of a decon chamber.
Since the purpose of containments is to control contaminants and often to withstand the rigors of negative pressure, the barrier must be impermeable, fire retardant, and strong/durable. Afterward come things like ease of use/setup, light transmission, price, and availability. It depends on the application, but if you are setting up negative air, then the choice is clear; no less than four mil thickness on the plastic will likely survive the intense demands of this environment. More importantly, that minimum is required by various federal and state regulations related to asbestos and lead abatement.
The latest guidance regarding mold remediation includes another encouragement to move up to heavier plastic. According to the current ANSI IICRC S520 2015 edition, “containment systems normally consist of 6-mil polyethylene sheeting.” In high-risk situations where redundancy is required, it may be recommended that double-layered plastic be utilized. One layer is theoretically just as effective as two. However, one critical difference is that a single tear or puncture can compromise single-layer plastic containment.
With space in the truck already at a premium, how many types of plastic do you carry, and how much? When dealing with others to choose supplies, the decision is sometimes more complex than one would think.
When, where, and how to use poles as your basic framework can also be daunting. The larger the piece of hanging plastic, the more critical it is to have some structural support such as poles or framing. When to use the specialized aluminum extendable poles (often with spring-loaded tops to facilitate secure placement) can often be as simple as whether you have enough of them and if they are bent, broken, or missing critical parts. Poles also make the most sense when timber, steel, or inflatable barriers are in short supply.
Another consideration when using poles is whether negative pressure will be employed.
The critical distinction that must be kept in mind is that dust control is not the same as negative pressure containment. Because there is not as much stress on the barriers, poles are better suited to the lower standard of dust control. Another evaluation tool to decide on the use of poles is when the speed of set up and short duration of the barrier are key factors. It is also important to remember that a bit more training is required for crews that will construct wood or steel for plastic barriers.
Plastic affixed to sliding steel or temporary wooden framing for a compression fit
Sometimes you have to tape the containment to the wall.
Strictly speaking, both techniques are similar to compression poles. Temporary compression steel framing is typically constructed out of steel wall framing studs. Wooden framing, usually built from 2-x-2 inch or 2-x-4 inch lumber, can be screwed, nailed, or held in place with special corner brackets. Overall, such products provide a solid framework that takes most of the stress away from the attachments of small areas or adhesives and spreads it more evenly throughout the structure.
With proper thought and implementation, little to no additional damage will be caused, but some assembly is required. Think of these methods as the Ikea of containment without the super easy-to-understand instructions. Because all jobs are unique, these contaminants do not come in “kits.” You will have to shop for and stock volumes of materials or take the necessary time to identify the needed sections and custom shop for each containment setup.
Fewer professionals in the restoration industry are familiar with the techniques of setting up steel support structures. They are most useful when carpentry tools, the skill to use them, or the timber is in short supply. There are unique advantages of using metal wall studs, with one of the most important being that the process does not require measuring in the traditional way. Instead, the remediation technicians cut two pieces of steel studs that equal the gap they are trying to fill, plus an additional 15% to 20% per piece. Cutting the extra length will ensure sufficient overlap between the two pieces and allow enough material for screws to lock it together.
When setting up steel isolation barriers as vertical supports, nest the two pieces of steel stud to fit together like two letter “Cs.” Once nested, put them in place and slide them apart such that they push against the top plate and sill plate. Once the initial expansion of the steel assembly is set, move them aside and then slide the two pieces just slightly so that they are longer than they were. Now with a 1/8 inch or so extra, screw them together in that position and then push or tap them back into place. The extra “slide” that you affected will have made them just a bit too long for the gap, thus creating tension.
Doing the same thing with wood requires precise, oversized measurements, but not too oversized. And if you cut it too short, you will have to shim it or possibly try to use the beam in another part of the structure. All the rest is similar to compression poles or wood. One distinct advantage, however, is that, unlike poles and lumber, magnets are easily integrated to connect the plastic to the framework. Furthermore, although tape, foam, spray adhesive, etc., are all still often necessary, steel does offer some distinct advantages. Strength, cleanability, reusability, low weight compared with green studs, and magnetism are some of them.
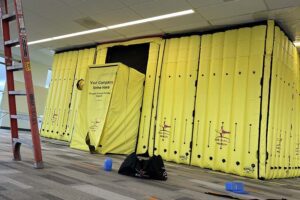
Reusable inflatable modular barriers
Relatively new to the industry are modular inflatable barriers. Like all the other options, these come with advantages and disadvantages. Some apparent disadvantages are up-front costs and the 10-foot ceiling height limit. However, any containment constructed over 10 feet tall will require special care and consideration to ensure that it is sturdy enough, even when it is only serving as a simple dust barrier.
An example of venting contaminants out of a window.
One of the significant advantages of reusable inflatable modular barriers is the savings on consumables. While this may seem like a fake benefit to many in the United States today, look around the other areas of the globe where single-use plastic for everything from water bottles to sheet plastic for barriers is being curtailed for environmental or cost control reasons. Inflatable modular barriers can also be an economical alternative because of the savings in the far more impactful labor category. Labor is the highest single cost for any business, but the skillset of your crew is critical. It doesn’t matter how much it costs to build if you don’t have someone that has the time and skill to build it.
Reusable inflatable modular barriers provide a stark comparison with everything that preceded them. Unlike all other options for structural support discussed previously, it is an all-inclusive solution to containment. That is because the structure is combined with the actual barrier and is “kittified” to adapt to different heights and widths of openings that need to be sealed. Fully formed five-foot sections of containment stored and transported in small duffel bags, such as those made by AIRWALLS, allows the contractor to quickly construct isolation barriers in various settings without resupplying or stocking any consumables.
Because the inflatable barrier is actually four layers of protection, it far exceeds the isolation requirements of some protocols, even for highly sensitized individuals. The four barrier layers also provide sound-reducing properties and thermal resistance of R20 for unmatched insulating properties. They move far beyond dust control into the realm of complete environmental control.
As one of the newer containment techniques introduced to the restoration and abatement industries, many professionals need to become more familiar with their advantages. Modular inflatable barriers are easily set up with little instruction and no specialized training. They will not cause collateral damage to the building and do not require any consumables associated with the standard forms of containment, like tape, plastic, spray adhesive, and assorted hardware. They have few parts and go up fast and effectively. Most importantly, using inflatable barriers eliminates the single failure points plaguing traditional containment.
Additional tips and tricks
To finish this section, here are several additional ideas to assist with reconstructing containments, presented in no specific order.
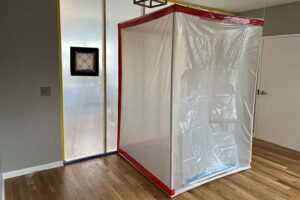
A properly sized containment will help maintain effective negative air.
Make your own double-stick tape. Roll off two-three feet of tape, but do not tear it yet, let the roll hang there. Hold the end of the tape, sticky side away from you, in your left hand, with your index, middle, ring finger, and thumb. Your thumb will be pointing away from your body. Press your thumb toward your middle finger, grasp the rest of the roll with your other hand, and spin it. That’s it, double-stick tape.
Use spring poles to aid with the setup of stud framework. Especially when setting up sliding steel or wood containment, use the compression poles to hold your top plate and sill plate in place to get your measurements and place the vertical members.
Filtering replacement air and regulating negative air, with this simple technique. Tape a pleated filter to the plastic sheeting’s outside (clean) side, 12-x-12 inch minimum. Once secured, step inside the containment and cut a U-shaped flap approximately one inch smaller on the other side of the filter. You can adjust the negative pressure and airflow by taping the plastic flap to cover more or less of the filter. Inflatable modular barriers have this as standard equipment.
Cover critical barriers with speed and ease. For electrical outlets and switches, remove the cover plate, place an oversized piece of plastic over the outlet or switch, then replace the cover plate with the original screws. You may also choose to tape the edges of the plastic. Do not use this technique if the wall plates are otherwise sealed to the wall; instead, just tape over the surface of the wall plate, outlet, and switch.
Many other materials, such as prefabricated wall sections with adjustable top pieces, can be used for temporary containments. Regardless of the materials, the key is ensuring the containment barriers are secure and decently airtight. The third part of this series will focus on using temporary containments to minimize cross-contamination.
Mark Cornelius has been in the restoration industry for more than 38 years. He is president of Disaster Recovery Industries Inc. and owns Emergency Mitigation Technician Academy.
Keith Gangitano co-founded Zeppelin, a company with restoration containment solutions.
Michael Pinto serves as the CEO of Wonder Makers Environmental and has more than 45 years of experience in the industry.