Job Costing and Documentation

By Kris Rzesnoski
It’s getting harder and harder for restorers to grow a profitable business, and it’s no secret that the last two years have not been an easy environment to operate in. Many restorers feel like their businesses are under increased scrutiny that is taking a toll on staff. It’s especially frustrating when you feel like insurance carriers aren’t working with you as you try to help people in their time of need. Restoration is an essential part of the insurance ecosystem, and you perform a service that is needed for the insurance industry to be successful. Theirs is a data-driven industry, and the data they require to make decisions comes from the documentation you capture in the field. The level of detail and accuracy you capture can make or break you.
I have witnessed firsthand that the best restorers in Australia, Canada, the United Kingdom, and the United States all have one thing in common: The ability to deliver major wins to the bottom line depends on field documentation systems and consistently sticking to the same process.
To build a foundation that will lead to consistent profitability, restoration companies must create a simple, repeatable process for the team to use while in the field. If you want premiere-level documentation, it’s essential to validate the work you did to justify and defend your actions; limit the exposure of pre-existing conditions/damages so you don’t pay for things you didn’t damage; and create repeatable processes, so your business runs more efficiently and routinely.
If you don’t focus on these things right from the get-go, you’re selling yourself short and setting yourself up for constant back-and-forth battles with reviewers, adjusters, and TPAs. You’ll be fighting for every dollar, and it’ll likely take forever to get paid.
At the very minimum, there are six types of field documentation categories you should check off for every job to protect your business—and your customer—from unnecessary scrutiny and delays:
- Overview
- Pre-existing conditions/damages
- Source/Cause of loss
- Resulting damage to structure
- Resulting damage to contents
- Pre-existing conditions/Damage to contents.
Taking the time to document the job properly instantly solidifies a process that will help your business succeed.
Overview
When to take them: During the first walkthrough (before beginning any work)
Benefit: You document exactly how the property was upon arrival.
This is the only opportunity for you to document the original condition of the building and contents before you start working unless you take these photos and videos immediately upon arrival at the site.
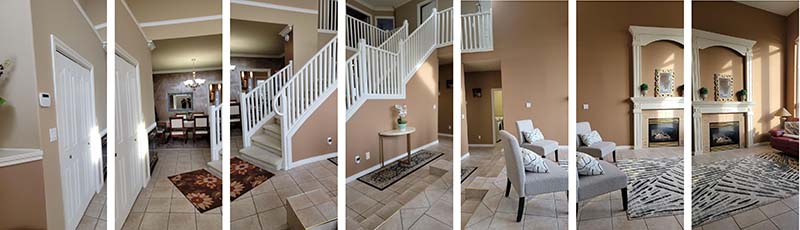
Start at the door of the affected room and take your photos left to right, slightly overlapping them. You want the images you capture to tell a story so that anyone reviewing your documents will understand exactly what you were looking at when you arrived.
These photos are critical. They will be used by your company’s internal resources, the homeowner, and the adjuster, and if taken poorly, they can be weaponized against you. Gaps in your documentation leave room for doubt, allowing people to further scrutinize your work and documentation capabilities.
Pre-existing conditions/damage
When to take them: During the initial walkthrough (before beginning any work)
Benefit: You clearly identify previous, current, or future issues.
The problem is people walk by their home finishings every day without noticing dents, dings, scratches, and other imperfections—until you and your team arrive. I can’t express how many times we have had to pay for walls to get painted or to repair damaged finishes or contents that we didn’t even touch. Unfortunately, that’s the nature of this business. Every restorer has this type of liability exposure, so it’s important to understand how to limit it.
Again, start at the door of the room and work your way around from left to right. This time, you need to focus in greater detail right down to the dents and dings, moving from top to bottom, but still maintaining a left to right flow. If a question arises in the future you can demonstrate, isolate, and identify any marks.
If the mark is on a flat wall surface, it’s a good idea to take a photo from further away from the location to provide some context. Look to frame a light switch, outlet, trim piece, or some other item in your photo capture as a point of reference to help identify the mark’s location.
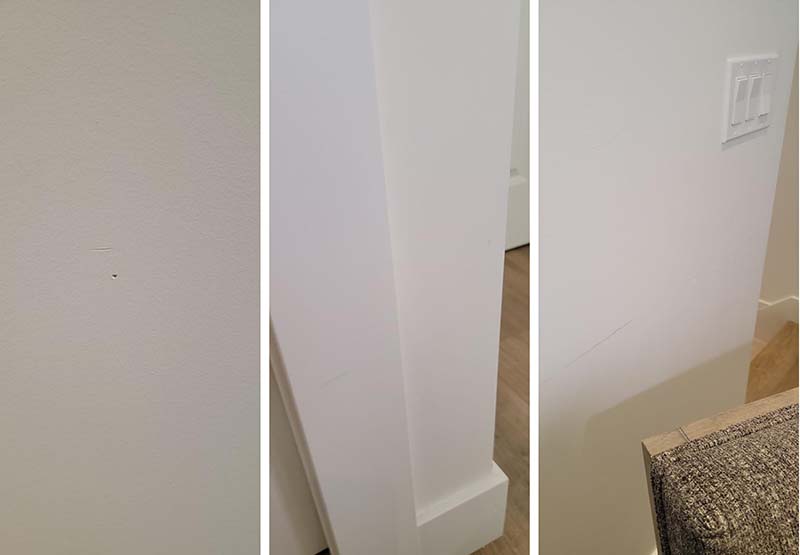
In this step you are looking for everything:
- Dents
- Scratches
- Stains
- Tears
- Discolorations
- Pre-existing mold/water damage (Don’t miss this one especially!)
- Odors (Use video to explain.)
- Sounds (Use video to demonstrate.)
We saved so much money on jobs when we slowed our response and actually took the time to protect our company. The bottom line increased, and the potential for any problems with the customer decreased. Overall, it cost us less time and money to close our jobs out by taking a little more time to do it right from the start.
Source of loss/Cause of loss
When to take them: As soon as possible
Benefit: This documentation helps your customer make their claim and determines your handling based on the IICRC S500.
There is a difference between the “source of loss,” a contractor term, and the “cause of loss,” an insurance term. Before we discuss how to document them, let’s clarify how these two terms differ:
The source of loss (SOL) identifies the place of origin for the loss and should be identified by the restorer. An SOL could be a ruptured water line, a punctured waterbed, seepage from the foundation, an overflowing sump pit, etc. For restorers, we are less concerned with how a loss happened and more concerned with where the loss originated from. A broken pipe is a source of loss, and we need to know what type of pipe ruptured. A supply line (drinking water) provides us with an initial categorization of water as a Category 1. A broken sewer line would provide us with an initial categorization of water as a Category 3.

The adjuster is more concerned with the cause of loss because the insurance policy revolves around what caused the loss in order to determine the level of coverage. The same supply line may or may not have coverage, depending on what caused the rupture. If the rupture was a sudden and accidental break in the line, the insurance policy might cover the break. If the rupture was a slow leak due to poor maintenance, the policy might not cover the loss.
But the restorer drying the building has to determine the source of the water and the current condition of the water, regardless of whether there is coverage.
Despite these differences, how you document the SOL and the cause of loss is very similar. When documenting the room, you should take a distant photo to provide fuller context, then move in toward the source or cause of loss until you can capture a closer photo.
The property owner and adjuster need clear pictures and accurate context. It doesn’t matter whether you are working with the adjuster or only for the property owner, the information you collect is still required by both parties to determine coverage, insurance dollars, and how the submission of the claim goes.
Resulting damage to structure
When to take them: You should take these on the first day. You may take more photos within 48 hours due to further water damage. You also should take these photographs when you open the wall structure or find damage that was concealed, as well, typically within the first few days.
Benefit: This documentation supports your actions in the field, assists the property owner in making their claim, and reduces conflict in a file review.
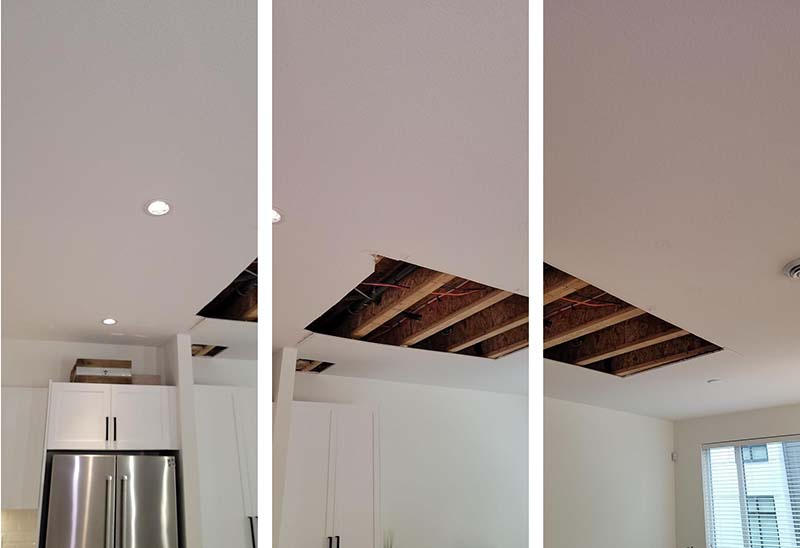
This category of documentation should be done with great diligence because it often expands the loss size and scope as time goes on and as materials are removed and additional impact is found. While it is common for more damages to appear after the initial assessment, it is uncommon for restorers to document the resulting damages after the first day, but these findings can have a huge impact on the restoration process.
For many novice restorers the resulting damage is taken upon the initial walkthrough and then never updated. This is where a good operator should pay particular attention to the resulting damages and document because an initial scope or rough order of magnitude of $10,000 could easily be increased to $25,000 upon removing some materials or waiting for the water to finish penetrating the building structure.
Using a digital or written change order is critical to documenting the reason for increasing or decreasing your costs based on what you find during your work.
Resulting damage to contents
When to take them: Before you move the content, while you are listing content, and during the cleaning process when damage is identified.
Benefit: This documentation supports your actions in the field, assists the property owner in making their claim, and reduces conflict in a file review.
We often think of contents as the stuff in our way when we are trying to do “real” restoration. The reality is, if you ever want to connect with someone, you must take very good care of their belongings.
Most restorers underestimate the importance of documenting the damage to contents. This is especially true if the contents are deemed non-restorable or economically non-restorable. These items are going to be documented, identified, and then thrown out forever, so you’ve only got one chance to properly document them so that the property owner can make their insurance claim and get the full value of those items.
While removing contents might seem like a chore, when you do it incorrectly, it can cost the customer thousands of dollars. Every item should be documented by capturing the following:
- An overview photo of the item
- The brand name of the item
- The model or serial number if applicable
or the tag (for size and style) - The quantity of items.
For items that are not retail brand name items—a 100-year-old oak desk, for example—you’ll need to get more information from the customer. What is the value of the item? Where did it come from? What’s the value to the customer? Is there anything else that should be noted?
Why did I choose the desk example? I once threw away a 100-year-old oak desk that was an heirloom from when the customer’s grandfather started his business. I misidentified the desk as walnut, to which the customer said, “The walnut desk has no value to me.”
I failed to walk the customer through the items being tossed, and I still look back with regret on that moment. I know a simple administration mistake resulted in a bad experience for the customer and for me.
After you’re done identifying all the items, share the list of pictures with the customer for a final review before permanently discarding those items. That way you won’t accidentally discard a family heirloom and cringe thinking about it for years.
Pre-existing conditions/Damage to contents
When to take them: Before you move any item; on all items over $100 (set your value)
Benefit: These limit your risk of paying for damage not done by your team, limit potential conflicts, and create a bond between you and your customer.
People are emotionally attached to the things they acquire throughout their lives. Of course, almost everything has a monetary value, but you cannot discount a customer’s
potential emotional attachment to any item. Focusing on this can change your relationship with your customer. When you document their possessions, you are doing two things:
- Reducing your liability: People don’t notice the wear their items pick up over time until you touch or move equipment around those items.
- Establishing a bond with the customer: They witness the care and attention to detail you take with their belongings, and you showcase your professionalism.
The beautiful thing about documenting the job to this level is, if you do make a mistake, most of the time the customer is willing to forgive you because they have witnessed your sincere and careful approach with their things. Once you have documented everything on the job, the only thing left to argue about is the things you actually damage, which most restorers will be more than happy to remedy.
Better documentation leads to higher profits
Your business thrives when you have repeatable processes that allow you to hire and retain new employees who can fit into your system and succeed in this complex industry. I repeatedly have found that, by spending a little more time at the beginning of a job to document the entire situation in greater detail, I am saved immense frustration and protect my employees from feeling doubted on every job.
It’s ok to slow down and document the job properly to do right by yourself, your team, and your customer. Your inevitable success will pay dividends and major time savings down the road.
Kris Rzesnoski is vice president of business development for Encircle where he is committed to driving delivery of intuitive, easy-to-use solutions that allow contractors to improve productivity and profitability. He is an RIA technical instructor, an IICRC approved instructor, a third-party evaluator, and owner of Reztime Training and Consulting. Rzesnoski sits on RIA’s Restoration Council and Canadian Education Committee and is the chairman of the Estimating Committee.

Kris Rzesnoski
Kris Rzesnoski is vice president of business development for Encircle where he is committed to driving delivery of intuitive, easy-to-use solutions that allow contractors to improve productivity and profitability. He is an RIA technical instructor, an IICRC approved instructor, a third-party evaluator, and owner of Reztime Training and Consulting. Rzesnoski sits on RIA’s Restoration Council and Canadian Education Committee and is the chairman of the Estimating Committee.


