Assessment and Testing After Major Disasters

By Slade Smith, RPIH, AIEH
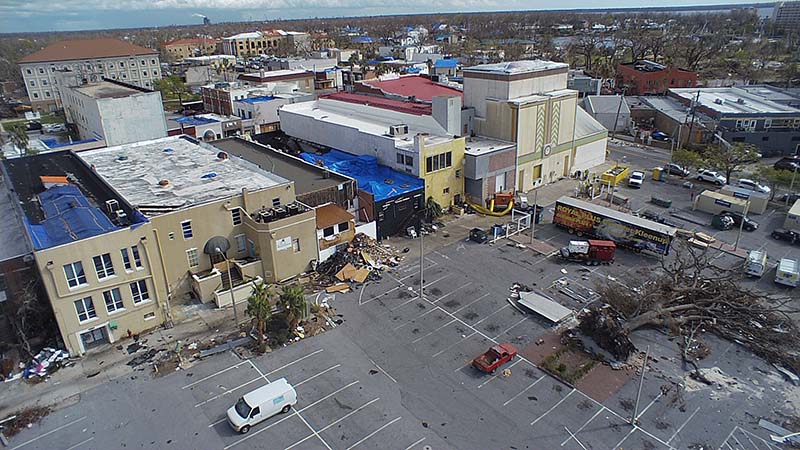
In recent years, many severe weather events have impacted North America, including a string of monumental hurricanes in Texas (Hurricane Harvey), the Carolinas (Hurricane Florence), and the Caribbean and Florida (Hurricanes Irma and Michael).
A slew of other localized and regional storms, fires, and cold-weather disasters have hit communities spanning the United States.
What these events have in common is the wide range of damage they cause to buildings, from flooding and wind-driven rain to related building-envelope failures that allow water to infiltrate into the structure.
The most pressing concerns for the building owners who have experienced these events include physical property damage to the finished surfaces, contents, and HVAC systems as well as biological concerns from the potential of contaminated water (Category 3 water) and, ultimately, fears of mold growth within the property.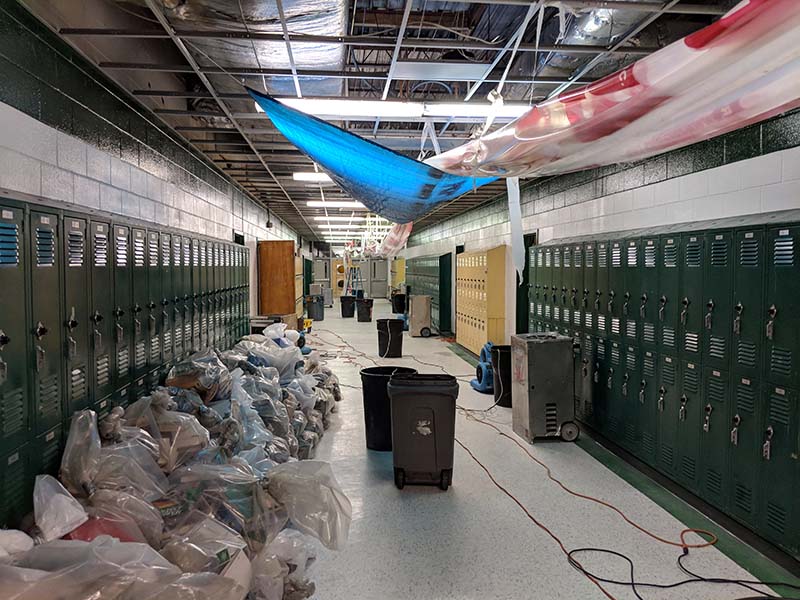
When one of these events occurs, the restoration industry descends upon the impacted community to assist with the cleanup, stabilization, and rebuilding efforts. Although many restoration projects for large-loss events may have similarities, others are unique. No matter which type of project you attempt to tackle, each one begins with assessment and testing to determine the extent of the damages. This article is not intended to outline how to do restoration or remediation work, nor is it meant to address regulatory differences between states that have licensing. Rather, this discussion is intended to provide useful tips and a technical perspective for restorers, remediators, indoor environmental professionals (IEPs), and assessors.
The following considerations will encourage a consistent approach for addressing the initial damage-assessment phase, analytical testing as part of the assessment, and the post-restoration/remediation phase to verify that the restoration work performed meets the goals outlined during the initial assessment. The amount and nature of data obtained through each phase will depend on the type of project, but the key is to gather enough information to illustrate the conditions of the property in order to tell a story. How well the story reads is a reflection of how you’ve organized and used the information obtained in the field during all phases of the project.
Assessment phase
Many published documents outline various approaches and items to include for assessing buildings impacted by large-loss events. Possibly the most well-known and utilized are the ANSI/IICRC S500 and S520 standards. Another excellent resource is the ASTM E2418-06 Standard Guide for Readily Observable Mold and Conditions Conducive to Mold in Commercial Buildings: Baseline Survey Process. These standards were developed specifically for the restoration and remediation industries and provide a good baseline of considerations for the restorer to implement for water damage restoration and mold remediation.
Other agencies and organizations have published similar guidelines that address how to approach loss events such as flood damage, hurricane damage, and mold contamination. The majority of these come from the U.S. Environmental Protection Agency, various state health departments, and the Centers for Disease Control and Prevention. Often the best advice is to combine important points from each reference and organize them for your individual purpose.
A good assessment of either residential or commercial properties should include the following:
No. 1: Interview
During, or if possible, prior to the site visit, identify a person or persons knowledgeable of the damage specific to the large-loss event and how it may have impacted the building. The interview can also provide background information on the physical characteristics, maintenance, and repair of the building. The goal is to understand the subject property’s historical repairs and replacements, history of occupant use, level of ongoing preventive maintenance, pending repairs or improvements, frequency of repairs and replacements, existence of ongoing or pending litigation related to its physical condition, the presence of observable water damage, mold, and physical deficiencies. It is within the discretion of the person doing the initial assessment to decide which questions to ask before, during, and after the site visit.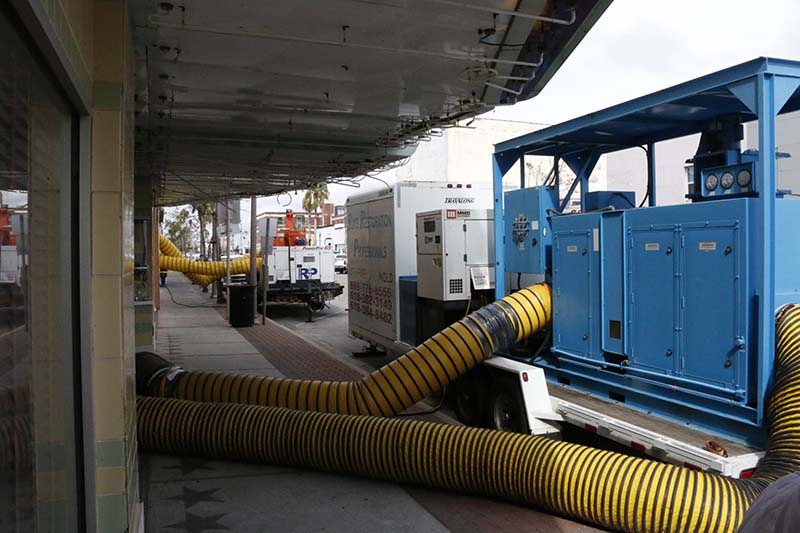
No. 2: Orientation of property
During the walk-through assessment, consider the property orientation to determine if the building is obstructed by bodies of water, adjacent buildings, or other obstacles.
No. 3: Photographs
Document the representative conditions and observable water damage, physical mold growth, and physical deficiencies with photographs. Make a reasonable effort to record the typical conditions, including observable water damage, mold growth, and physical deficiencies, if any.
No. 4: Specific areas to inspect for damages
Examples of areas to include in the inspection are as follows:
- Exterior—Visually and physically inspect the periphery of all structures on the property.
- Exterior building walls—Visually and physically inspect the exterior building walls.
- Mechanical systems—Visually and physically inspect mechanical systems, including HVAC systems and cooling towers.
- Roofs—Inspect roofs for obvious signs of leaking, such as split seams and excessive areas of patching (frequently identified on flat gravel-surfaced roofs by the gravel being moved to allow repair and not being replaced over the repaired areas).
- Air intakes—Inspect HVAC air intakes for signs of mold or for standing water in their vicinity.
- Interior—Visually and physically inspect the interior of structures on the property: Readily accessible common areas expected to be used by occupants or the public (such as lobbies, hallways, utility rooms, and recreation areas), maintenance and repair areas (including mechanical rooms), and a representative sample of occupant spaces. Additionally, examine attics, basements, cellars, and other such areas of the building not usually occupied. Use moisture meters, moisture sensing probes, borescopes, thermal imaging, and the like to survey under floors, above ceilings, behind walls, or within confined areas such as chases, ducts, or crawl spaces. These areas are not generally considered readily accessible and warrant an extraordinary physical search.
- Interior areas near visible exterior water damage or drainage—If the exterior walls show water damage or drainage (gutter discharge), inspect the interior walls adjacent to these visible exterior conditions. If reasonably possible, inspect the interior wall cavities of exterior walls. If needed, you can inspect these locations from above hung ceilings or through existing wall penetrations.
- Interior areas near below-grade exterior walls—Inspect interior wall surfaces that are near locations where the exterior of the building is below grade or at a lower level than the surrounding land. If reasonably possible, also inspect the interior wall cavities of exterior walls.
- Toilet rooms and bathrooms—Observe toilet rooms and bathrooms for operational exhaust fans, leaking plumbing fixtures, and sewage backflow. Observe, and if accessible, operate exhaust fans to ensure they are drawing air from the space. Check the areas around the fans for mold.
- Kitchens—Observe kitchens, including enclosed cabinets and areas beneath sinks and around traps. As in bathrooms, observe and test exhaust fans and check for mold.
- Condensation/Drip pans—To the extent that they are readily accessible, inspect condensation/drip pans under coils of air conditioners or other HVAC equipment for standing water and microbial growth.
- Crawl spaces—Inspect crawl spaces and document those conditions that are easily visible from your point of access. Note any evidence of previous substructure flooding or water penetration if easily visible or if such information is provided.
- Basements, cellars, and elevator shafts—Observe basements, cellars, and elevator shafts along the building’s exterior perimeter walls for evidence of visible mold, significant water intrusion, or both. Inspect any sumps, perimeter channels, or other areas of open water in the basement and cellar.
- Plumbing—Inspect exposed plumbing in basements, cellars, and other readily observable locations for water leaks or condensation.
- Fire suppression systems—Observe exposed fire suppression system components in basements, cellars, and other readily inspected locations for leaks or condensation.
- Windows and sliding doors—Inspect frames and perimeters for observable standar, mold, and physical deficiencies conducive to mold, such as condensation, as well as areas where leaks can occur.
- Attic spaces—If readily accessible, observe attic spaces, especially around roof penetrations where flashing would be expected. On buildings with pitched roofs, inspect, if possible, areas near buildings’ eaves. Inspect attic insulation for signs of observable water damage, mold, and physical deficiencies conducive to mold.

Assessment phase analytical testing
The assessment should include some level of testing to investigate the condition of building materials for water impaction damage, microbial contamination of the building materials, HVAC system, and contents—and in some cases, the air quality within the building. The minimum tools to perform a visual assessment include a moisture meter to determine the moisture content of building materials and a hygrometer to measure important environmental factors such as relative humidity, air temperature, and surface temperature. More elaborate tools, such as thermal imaging devices and data logging sensing equipment, could also be employed.
An assessment performed by an industrial hygienist, IEP, water damage and mold assessor, or consultant may also include biological testing of building materials and bioaerosol air quality sampling. This is accomplished using direct measurement techniques with tape lifts, surface swabs, ATP measurements, bulk sampling of materials, wipes, fungal air spore trap testing (total microscopy analysis), culturable air, and related collections. These techniques can be used to analyze bacterial pathogens and total biological load and contamination, as well as mold growth contamination and potential aerosolization throughout the impacted and adjacent areas.
The purpose of any testing is to provide a baseline of the representative conditions present. The test results complement the visual assessment and sensing measurements and develop conclusions and recommendations for a restoration and remediation work plan. This includes environmental stabilization, drying efforts, restorative cleaning, and mold or biocontamination remediation. Conditions within water-damaged buildings can change quickly, especially where there is little or no climate control, so any testing performed is generally a grab sample or snapshot of the representative conditions. Environmental testing is not designed to be diagnostic in nature, nor is it intended to provide any medical conclusions. Rather, it is another tool to help tell the story of what is going on within a building that has sustained a large loss.
Post-restoration/remediation verification phase
Once the restoration or remediation work is completed, the final post-restoration/remediation verification (PRV) phase should be performed. Depending on the type, size, scope, and budget of the project, the PRV phase could range from a minimal final assessment to one that is extremely complex and comprehensive. The time between restoration or remediation completion and some level of repair or reconstruction of the building is weeks or even months, so the conditions present during the PRV are only going to represent the conditions at the time of the evaluation and possible testing.
In the publication Post-Remediation Verification of Mold and Bacteria Projects, Dr. Robert Brandys and Gail Brandys offer guidance on the PRV phase that can be applied to residential and commercial properties and to large-loss situations. The focus of this publication is how PRV can be broken into five levels of cleanliness assurance based on the risk levels of the occupants. The following summarizes the PRV levels outlined as a consideration to verify project completion and related quality assurance:
PRV level 0-A (visual PRV only) and level 0-B (level 0-A with documentation)
- The amount of water damage or mold growth is small
- A small or limited release of water occurred
- The conditions for mold growth were not favorable (e.g., it dried rapidly)
- The remaining building materials do not support mold growth or were not impacted
- No high-risk occupants are involved
- Proper remediation practices were followed
- Photographs of the remediated area were taken
- Moisture and humidity levels are normal
- Materials removed and the method of how surfaces were cleaned (e.g., HEPA vacuum cleaned, wet wiped, etc.) are known
- The condition of the surrounding building components and why these materials did not have or did not support mold growth are known
- Items were treated with a biocide or an encapsulant/coating was applied
- Replacement materials are mold resistant
 PRV level 1: Level 0 conditions don’t exist
- Some porous materials are left
- Water was present for a period of time
- Conditions were favorable for microbial growth
- Water may have flowed to adjoining areas
- Previous water intrusions have occurred there
- Remediation practices are not verifiable
- Visual inspection of ductwork is inconclusive
PRV level 1: Level 0 plus testing
- Documentation of airborne mold spore levels being acceptable
- Documentation of removal of mold contamination on surfaces, typical remediated surfaces; swab or tape testing of known restored or remediated area
- Inside ductwork, vacuum sampling with template
PRV level 2: When level 0 conditions don’t exist, and occupants are reporting generalized symptoms or bacteria growth is also an issue
PRV level 2: Level 1 with more testing
- Documentation of airborne mold spore levels being acceptable, and
- Documentation of return of mold contamination on surfaces to background levels, and
- Documentation of bacteria removal and disinfection as necessary
PRV level 3: Cleanliness assurance for highly sensitive occupants or unknown situations
- Documentation of airborne mold spore levels being acceptable, and
- Mold growth and biocontaminated materials
adequately removed by the remediation firm, and - Remaining dust reservoirs in the remediated area will not be affected by air movement in the building or walls in the future
- Airborne mold spore level testing
- Aggressive dust removal techniques (air washing)
- Dust level testing (using particulate counter)
- Establishing statistical significance
- Both culturable and total mold spore testing
- At least three sampling locations in the remediated area
- Total of six samples in remediated area
- Quality control reference samples (outdoors, outside containment, unaffected areas)
PRV level 4: Cleanliness assurance for high-risk occupants (such as immunocompromised occupants) and high-risk environments (such as hospitals and retirement homes)
- All the items in level 3
- Infection control risk assessment (ICRA)—health care related
- Establishing statistical significance of the monitoring data
- Hospital standards apply: < 1 spore/m3 Aspergillus spp.
- Clean room standards apply for particulates, mold, and bacteria in the air and on surfaces
- Requires longer sampling periods and/or more samples collected
Conclusion
A logical and concise approach for evaluating large-loss projects after a hurricane or flood-related event is not only recommended but necessary. It ensures that expectations for proper restoration/remediation are met and that the quality of the outcomes is acceptable to an IEP and, ultimately, the building owner. A consistent approach to conditions assessment, analytical testing to help with the scope of work development, and appropriate PRV will provide a level of repeatability that restoration contractors and IEPs can rely upon to meet industry standards and to substantiate the costs associated with performing these types of projects.
Slade K. Smith, RPIH, AIEH, is an IICRC master restorer, a registered professional industrial hygienist, and is the owner, president, and CEO of the Industrial Hygiene Consulting Corporation, a private environmental consulting and testing firm focused on identifying and solving indoor environmental problems, building-related deficiencies, disaster and water loss consulting, and microbial impacts of water loss events. He can be reached via email at [email protected].